Monday, July 25, 2011

Presentations Without Internet Access

Imagine that your abstract is accepted for a four-hour workshop at a national convention, demonstrating basic web skills for building nursing educational websites only to learn that there would be no Internet access. I recently had this experience but was still able to offer the program by using video screen captures that nicely complemented my presentation.

I tend to be a bit paranoid when relying on technology during a presentation. A single technical glitch can eat up precious time meant for the program in trying to troubleshoot the issue. Over the years I have experienced no Internet access related to facility limitations, poor Wi-Fi reception, excessively slow downloads of YouTube videos, air card connection problems, inability to download certain software on a host laptop, audio limitations, and more.  For demonstrations that rely on an Internet connection, backup is essential in the event a solid connection fails.
In January 2010, I gave a presentation for my Epsilon Mu chapter of Sigma Theta Tau International. Part of this presentation included demonstrating the use of Skype as a means of virtually bringing a live guest speaker to the program. In preparation, I requested Internet access well in advance to facilitate this portion of my program. I also spoke directly to the IT specialist who was setting up the room for the program. I had the assurance that Wi-Fi access would not be a problem. However, because Skype was not installed on the school’s laptop I could not deliver the live interview. My laptop was also unusable because I did not have an account on the school’s server. Attempts of downloading Skype onto the school’s laptop also failed as none of the organizers had “Admin rights.” The program was on a Saturday so IT assistance was unavailable.
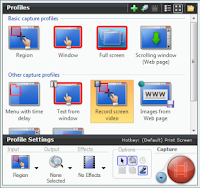
Fortunately, I could deliver this portion of the demonstration because I did have backup. I made a video capture of the interview earlier in the week “just in case” I could not access Skype. The pre-recorded capture captivated the audience by what appeared to be a live interview. After that experience I have found that video screen capture back up is the next best thing when Internet access is not an option for your presentation. For a capture with audio:
  • Use screen capture software (such as Snagit, Jing, JingPro, etc)
  • Check that the volume is at a good level
  • Check that the audio settings are on
  • Fit/size the region of the screen to record
  • Select “Record Screen Video.”
  • Click on “Capture”
The above actions only take about a minute. I strongly recommend checking the volume and audio settings. Should the volume setting be at a low-level otherwise the production will be barely audible. When using a video as a backdrop for demonstration purposes while speaking to a live audience, remember to mute the audio settings prior to recording the capture. An example for this might be a demonstration on how to resize a picture on a webpage. 

Wednesday, June 8, 2011

Laser Pointers No More

Laser pointers have been traditionally used in conjunction with electronic slideshow presentations as a means of emphasizing a specific part of a slide. Despite the usefulness of this tool, sometimes the red beam of light can serve as a distraction depending on the ability of the presenter. I have attended PowerPoint presentations where the bright red beam has erratically jumped all over the screen. Over the years I have owned several laser pointers and I found them useful when working with a much larger screen projection. In the past few years, I stopped using the laser pointer by replacing it with the insertion of non-filled shapes with brightly colored borders along with custom animations directly on my slideshow presentation. By using this method, I find that I have more control and I do not have to worry about holding the beam of light steady or circling a region continuously. The added bonus is that I don’t need batteries!


Procedure:
  1.  Click on the “Insert” tab
  2. Click on “shapes”
    • Choose the shape (I generally take a square or circle)
  3. Size the shape over the first region to emphasize by holding down the left side of the mouse while gliding the “+” symbol on the field until the desired size has been achieved
  4. Click on the "Shape fill"
    • Select no fill
  5. Click on "Shape outline"”
    • Select “color” in the drop-down box (bright red)
  6. Click on “Weight”
    • Select: 2 1/4-3 pt
  7. Click on the "Animations"  tab
  8. Click on "Custom animation"
  9. Click on drop-down menu on the "Add effect" button
    • Click on "Entrance"
    • Click on "Faded zoom"
  10. Click on drop-down box for first animation
    • Click on “Effect”
    • Click on drop-down box for “Don't dim"
    • Select “Hide on next mouse click"
  11. For highligthing multiple areas; copy the shape and re-size it over the next region (all animations will be duplicated)
  12. Recopy the shape as needed

Thursday, May 26, 2011

Cell Phones, Hospitals, and Social Media

Infusion phlebitis
Picture: Copyright 2011 Teresa Heithaus

Over a year ago my son was admitted to a local hospital for emergency surgery. The hospital was known for its excellent reputation and for its ANCC Magnet status. He developed some complications following surgery that extended his stay longer than expected. During the hospitalization he developed a Grade 3- 4 infusion phlebitis. I uncovered the phlebitis by examining his right arm after he complained about pain at the IV site. I pulled up the sleeve on the hospital gown and saw a long red streak that extended from his antecubital region up to his shoulder. Immediately, I called his nurse who examined his arm and discontinued the IV. After the nurse left the room, I dug through my purse and pulled out my cell phone. I wasted no time in taking a photograph of his affected arm. I was not thinking of litigation but rather, I believed this would make a good photo for the IV course that I teach at my institution. An added plus was that I could easily obtain permission for use of the picture. His nurse soon returned to tend to his arm.
Uploading pictures or videos onto a social media site from a smart phone takes only seconds.  In general, any individual with a smart phone can simply click on a social media app such as Facebook, followed by clicking on the "+" symbol and choose either a picture on file or “Take a photo/video.” In moments, a person can post the picture or video along with a “comment” on a social media site for every "friend" or "follower" to see. From my perspective, most of the pictures or videos posted by my family or friends have been positive, fun, or just plain silly. However, this does not limit individuals from posting negative, malicious, compromising, and hurtful comments, pictures, or videos on social media sites.
 A nursing colleague had once told me of a patient's family member who insisted on using his cell phone to videotape discharge education his mother was receiving in the hospital. She asked the family member not to videotape the session as she felt it was “distracting and made her uncomfortable.” I suggested that the development of “scripted,” educational, video tutorials become available on the hospital Internet site for the purpose of patient education. This way, patients and their families can be directed to the website for viewing the information while providing their full attention to the live educational session.
Disgruntled consumers have been known to write negative feedback on websites or even post disparaging videos on YouTube.  Some institutions have resorted to creating policies to combat the taking or posting of pictures and videos (on the Internet) by imposing a ban on such activities while on the hospital premises. However, do such policy statements stop anyone from taking pictures or videos with his or her cell/smart phone when such actions can be done quickly and covertly? The discovery of such posts generally occurs well after the fact.

Wednesday, May 18, 2011

Online Newsletters for Staff Development Updates

In November 2010 I went to the AAN pre-conference kicked-off where I attended a terrific presentation given by Barbara Rickabaugh RN, MSN  from UC Davis Medical Center. Her presentation was on developing online hospital newsletters. What I enjoyed about this particular short program was that the information was practical and resourceful. Barbara Rickabaugh discussed a useful way of organizing hospital-wide departmental information (generally found in e-mail distributions) by creating a monthly newsletter for the hospital’s intranet site. As I listened, I thought how this concept was a great way of consolidating important announcements in one monthly document!  
Following monthly department meetings, staff development (SD) instructors at my institution perform a variety of on-unit in-service updates. These updates include new or revised policies, procedures, products or initiatives. Based on Barbara Rickabaugh’s idea, I developed an online monthly SD newsletter that incorporated these in-service updates in an online staff development monthly newsletter complete with links and pictures. I also added an attestation link that staff can use to document that he or she reviewed the information in the newsletter.
I limit the newsletter to two sides. The links connect to “Fast Facts,” tutorials, new product information, in addition to policy and procedure documents. If a link connects to an Internet site, I request IT to “bypass the proxy” to allow access by staff who do not have Internet privileges.  Attractive Newsletter templates are available on the Microsoft Office site in Word, Publisher, and Outlook. I am fortunate to have several of my SD colleagues review and edit content.  Review and editing are necessary to ensure accuracy and readability. The newsletter has been well received and serves as a good resource, especially for those who missed the on-unit in-service.

Tuesday, May 10, 2011

Survival Tips for the Prospective Online Nursing Student

Distance learning or online education is an excellent option to consider if you are thinking of going back to school to further your degree. Some healthcare systems are now requiring a higher degree as a condition of employment. I received my MSN degree from one of the well-known distance learning programs. After graduating I participated in two online certificate programs, and I have recently begun teaching in this venue. From these experiences, I garnered valuable skills such as networking, online collaboration, computer literacy, and leadership. I recently wrote an article for BestNursingDegree.com offering some tips and advice to consider for the individual who is seriously thinking about pursuing this route. Read my recommendations and survival tips in "Online nursing degrees: Guide to success." When selecting a school, check the accreditation of the program, requirements, and do your homework to determine if the program is a good fit for your busy lifestyle.  BestNursingDegree.com offers information on its "Online Nursing Degrees" including an extensive listing of online programs.

Thursday, May 5, 2011

Making Online Attestations

I use attestations to affirm that an individual has read an online posting or activity. This is similar to using a clip board with a sign in sheet for on-unit updates or a “read and sign,” except this is done electronically. Attestations can be easily made by using an online quiz maker or manager. I use the test template in my account with QUIA but I've also experimented with the quiz maker on ProProfs and Blackboard. By using an online quiz maker I can track who participated in the online activity and what unit they came from. The basic templates for most quiz makers are similar in structure. To create an online attestation by using a quiz maker, I do the following:
1.       Click on “Create a quiz”
2.       Name the quiz: For attestations I generally use the following "Attestation Form: Name of the online activity "*
3.        “Description”: Provide a brief instruction such as the following:
 Please indicate "True" or "False," attesting that you have completed reading the online activity. Enter your first and last name in the boxes provided below.
4.       Add one “True-False" question
5.       Enter the value for the one-question quiz at 100%
6.       Enter the following statement in the question box:
a.       I attest that I have fully reviewed the “Name of the Online activity”*
7.       Select “True” as the answer
8.       “Settings”
a.       Uncheck the options for” Question number” and “Point values”
9.       "Access"
a.       Logon required: with this option your student rosters should already be set up
b.      No logon required: no rosters required; however you will not be able to filter your participants by unit
10.   “Global settings”
a.       Enable the quiz
b.      Show all questions
c.       Anonymity: Require student names
d.      Feedback: Select no feedback
e.      Attempts permitted: Select “1”
f.        Security: Disable copy, paste, and printing
11.   Click “Done”

12.   The Attestation page will have a specific URL located in the address bar
a.       Copy the link
b.      Make the link available on the web page where the activity exists. I generally hyperlink an interactive button.
* In place of the words, “Name of the online activity,” add the actual name of the activity.
If your staff does not have access to the internet request by-passing the proxy from your IT department for the URL. By requesting the bypass, staff can directly access the attestation. 

Saturday, April 30, 2011

When Real Life Collides with Social Media

I have always considered myself to be good at multi-tasking.  Through the years I've managed my home, raised a family while being a working mom, made time to see friends, prepared home-cooked meals,  and even fast-tracked my MSN degree. I also found time to go to go on dates with my husband, work on hobbies, and even volunteer for professional organizations. Over the years I dabbled in various chat rooms and online forums. About two years ago I decided to take the plunge and engage in social media in a meaningful way. I signed up for an account on Twitter and decided that I would micro blog about anything related to nursing staff development. Within this venue I began to meet other nurses, educators, people in public relations, information technologist, managers, editors, and writers. I had to admit that this was an amazing way to share knowledge, events, and experiences that I found relevant to my practice and incredibly easy to do. In short, I was engaging in a cacophony of information from all parts of the world.
Over the next two years I found myself taking on more responsibilities. At work I was busily building online educational modules and managing both the nursing intranet and Internet educational websites for my institution. I had even experimented with different platforms for online Journal club including Facebook. I also took on the task of being the webmaster for my local Sigma Theta Tau International chapter while serving on the educational committee for another professional organization. For the first time in my career, I began submitting abstracts for national conferences, and they were even being accepted. Finally I decided that it was time to work on my own blog site. This is something that I had been putting off for quite some time because I knew that this was a responsibility and a commitment. During this time I had also received a full scholarship for an online distance learning program. This online program was time-consuming but I believed the endeavor added value to my experiences as a nurse educator as one of my professional goals was becoming a distance learning mentor for a nursing college.
Work was ramping up as my hospital began the process of converting to electronic health records. I became involved in this project while maintaining my online and other staff development job responsibilities. It was not my imagination that my real-life responsibilities were mounting. I was also as a TA in a distance learning informatics course. If that was not enough I had started a fiction book a year earlier and I was 340 pages in and with a chapter and a half left to complete it. Thank goodness my children are grown up otherwise I do not know where I would have found the time to do any of these things. In the social media realm, I continued networking with some amazing nurses and trying to work on a number of projects while continuing to blog and tweet. Despite juggling so many obligations I found that I was still able to deliver the goods until life recently threw me several unsettling curveballs in short order.
I underestimated the effects of overstretching myself that left little room for grieving or coping. I found that I was in overload and could not do another thing. I know that I am not the only person who has gotten herself into this situation. High achieving, high energy, type A personalities with a penchant for perfection, find  themselves running the risk of hitting the tipping point that ultimately leads to overload and burnout. The problem with this type behavior is that it does not leave any reserve for dealing with lifes inevitable tremors.  I needed some downtime.  I stopped blogging for a while and sporadically tweeted. This was not planned, it just happened. I knew I had to regain my footing. I stepped back for a while and decided to:

  • Set my priorities while maintaining boundaries to restore a healthy balance in my life.
  • Know my limitations
  • Engage in the endeavors I enjoy
  • Stop volunteering for  things that I do not have time to do or want to do
  • Finish the projects that were started a while ago
  • Carefully consider new requests that will impact on my time 
  • Set time aside to re-energize myself 
  • Reengage and and connect with others
  • Recognize that I am human 

Tuesday, January 25, 2011

Making Crossword Puzzles for Nursing Education Using Excel 2007

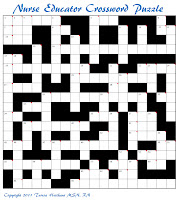
I enjoy solving word games. Not too long ago, I used to create crossword puzzles by using graph paper. Excel offers a perfect platform for staging crossword puzzles because of the grids that are in place on each spreadsheet. Each box in the grid is adjustable in size in addition to other formatting features. Click here to try the "Nurse Educator Crossword Puzzle."
To make a crossword puzzle:
  1. Make a list of words and their clues that you want to include in the puzzle 
  2. Consider the number of boxes across and down based on the length of the longest words on the list
  3. Highlight the area of the puzzle on the grids of the Excel sheet 
  4. Format the size of the grid boxes by adjusting the headings on both the width and height to a size of 40 pixels
  5. Start the puzzle in grid box B-2.  Leave the “A” column and the horizontal “1” line blank                                                                               
  6. Begin placing one letter for each word in an individual grid box  
  7. Fill any blank boxes by clicking the “Fill color” icon and click on black or your color preference
  8. Optional: Add numbers by inserting a text box to the appropriate grid box 
  9. Add the clues by clicking on the box with the first letter of a word.
    • Right click and select "Insert Comment" from the drop down menu. (This idea I got from Internet 4 Classrooms site)
    • Keyboard your clues in the comment box
  10. Add a title and instructions
  11. Remove the gridlines, headings, and formula bar by clicking on "View" and uncheck those three options.
  12.  Save as an "Excel 97-2003 Template" for compatibility
  13. Highlight the puzzle and delete the letters 
  14.  By saving the puzzle as a template, the puzzle shape and clues can not be changed but the user can fill in the blank boxes
 Click Here for the printable version of the "Nurse Educator Crossword Puzzle."
The Internet 4 Classrooms site explains how to make an interactive Excel crossword puzzle. There are many free software offerings available on the web for making crosswords but I'll discuss them in another article!


References

Brooks, S. & Byles, B. (n.d.). Making an interactive crossword puzzle with Excel.
     Retrieved from http://www.internet4classrooms.com/excel_puzzle.htm